
This document will detail the problem and how to troubleshoot the problem.
The problem at hand is when you are running a cut file using RDWorks, and the object does not close. For example, if you try to cut a circle, but the laser does not complete the circle at the same spot it start. See example below.
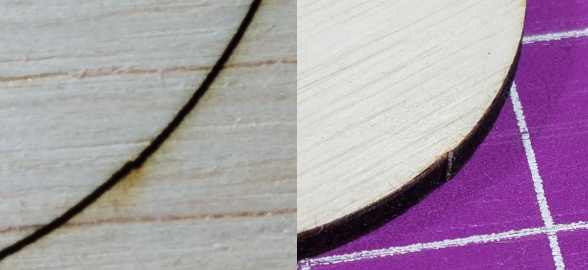
As shown in these pictures, the laser did not stop in the same position, leaving a little bump on the cut.
Y-Belt Tensions
The first thing to check is the Y-Belt tensions. It is imperative that the tensions are equivalent between both belts. To do so, adjust the screws on the side, and use your fingers to pinch them. Once the belt tensions are equivalent, run a circle test and check if the circles now close. If the issues persist, move on to the next troubleshooting steps.
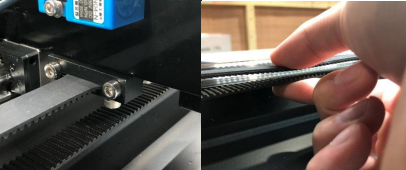
Use the side screws to adjust to the appropriate tension.
Step Length Check
Next, have the customer laser a line on material about 10 inches long. There should be two lines; one horizontal, and one vertical. The customer will then laser these lines into the material, and measure out the actual length that was lasered on the material.
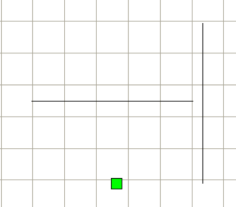
These lines are to be engraved into the material to see if they are the same length when output.
The next troubleshooting step is to check the step lengths into RDWorks. To do so, first go to the vendor settings under the file tab. Once there, be sure to input the password "rd8888".

Once vendor settings is clicked, the password box pops up.
Next, click the read button, then click the three dots button next to the step length box. Another window will pop up, and this is where you would enter the graph length and measuring length. The graph length is the theoretical length, meaning the length that was set in RDWorks; for this case, 10 inches. The measuring length is the length that the customer measured when the line is lasered into the material. Be sure to convert the measurements to millimeters.
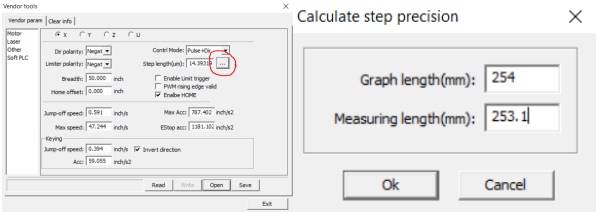
The step length precision will calibrate the machine. Be sure all measurements are in metric units, specifically millimeters.
If this does not fix the issue, move to the last troubleshooting step.
Swapping the Drivers
The next step is to swap the stepper drivers. First, have the customer run a circle test and see where the circle is not closing. Next, turn the machine off and go find both X and Y stepper drivers. The customer will need to swap both green connectors, and run a file again. Once the circle is ran again, check to see where the circle is not closing again. If it is in the same spot, it isn't a driver issue, but if it is in a different spot, there is a change one of the drivers is faulty.
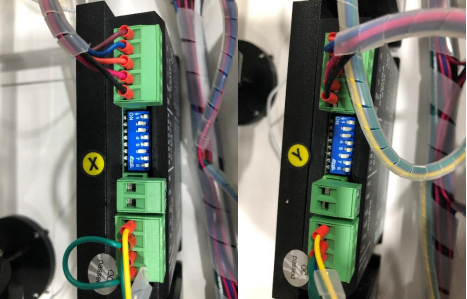
Ensure both left and right green connectors are swapped before running the second circle test. This will allow you to check if the drivers are faulty.